
Using the right backing sheet makes a difference in baking and cooking. When you use parchment paper, this is what you need to know: it’s a non-stick, heat-resistant sheet that helps prevent sticking and simplifies tray cleanup.
Here are key properties:
- It typically has a silicone or similar coating to provide non-stick release.
- It can handle high oven temperatures (many up to around 220-230°C or more) without burning or sticking.
It’s different from wax paper and butter paper, which are not designed for high-heat use.
In short: using parchment paper can give you better cooking performance, less mess and more consistent results.
Why it matters for your cooking
When you want to bake or roast without worrying about stuck cakes, burnt bottoms or messy trays, parchment paper is your ally. Here’s why:
- Ensures even heat distribution so cookies, pastries or roasted veggies bake more uniformly.
- Prevents sticking, so you spend less time scraping and cleaning.
- Works for multiple cooking methods: baking, parchment paper roasting, steaming in parcels, lining trays.
- For home and small business kitchens, investing the right kind means fewer failed bakes and better presentation.
If you’re sourcing supplies, you may find specialist providers like delipaper.co.uk mentioned for good quality rolls and sheets.
How to pick the right parchment paper
Choosing between brands, sizes and types isn’t just about price. Consider the following:
- Heat tolerance — make sure it’s rated for enough temperature for your oven or cooking style.
- Coating quality — thicker silicone coating provides smoother release and better durability.
- Sheet vs roll — pre-cut sheets for convenience; rolls for custom sizes.
- Bleached vs unbleached — unbleached often more eco-friendly; bleached gives a clean white look
- Brand/reliability — choose a supplier with food-grade certification and temperature ratings clearly stated.
By selecting correctly you reduce risk of tearing, curling or paper burning under high heat.
Best uses and techniques
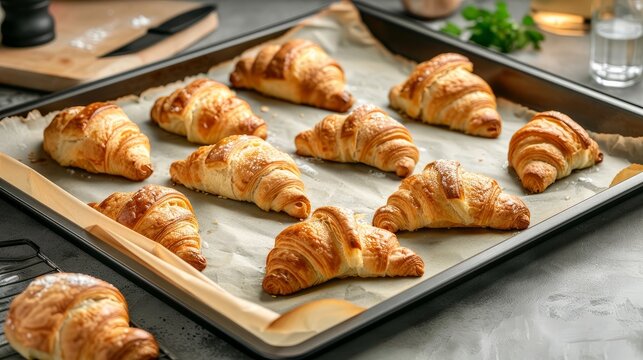
Lining trays & pans
Cut a sheet of parchment slightly larger than your tray, let the edges overhang for easy lifting. No greasing required.
- For baking cookies or cakes: place direction-appropriate side (if specified) facing up.
- For roasting veggies: the non-stick paper allows crisping without sticking.
- For heavy loads (like a whole roast): use a thicker sheet to avoid tearing.
Cooking “en papillote” or parcel style
Wrap fish or vegetables in parchment paper packets to steam in their own juices. A widely used technique
Steps:
Cut a large enough rectangle.
Place ingredients with seasoning in the centre.
Fold and seal edges tightly.
Bake until cooked through.
This method locks in moisture, flavours and reduces mess.
Storage, separating, rolling dough
- Use parchment to separate layers of cakes or cookies before freezing or plating.
- Place parchment under dough when rolling to avoid excess flour and easier transfer.
- Wrap leftovers or pre-portioned meals to keep them fresh and avoid cling-film alternatives.
Common mistakes to avoid
- Using wax paper in the oven instead of parchment — not heat-safe, may smoke.
- Placing parchment too close to heating elements or open flame — risk of charring.
- Reusing a sheet that’s already browned, oily or brittle — non-stick performance declines.
- Selecting a paper that is too thin for heavy duty tasks — may tear or shift while cooking.
- Not cutting the paper to size — the excess may fold and cause uneven cooking or burn.
Advantages for professional and home cooks
- Consistency — better baking outcomes, fewer stuck trays, cleaner bottoms.
- Efficiency — quicker cleanup means faster turnaround between batches.
- Presentation — baked goods lift cleanly and look professionally finished.
- Versatility — one tool covers many cooking needs; a good roll can last for many functions.
- Hygiene — disposable liners reduce cross-contamination in busy kitchens. For example, commercial 50m rolls labelled “baking parchment paper – greaseproof / non-stick” emphasise reduced cleaning time.
Integrating into your kitchen routine
Try the following workflow to make the most of parchment paper:
- Before starting: Measure and cut sheets to fit trays and pans; store rolls flat to avoid curling.
- During prep: Line trays, place food, bake or roast without sticking concerns.
- After cooking: Lift product off sheet easily; discard sheet or, if still good, use again for light tasks.
- Between uses: Check the sheet condition — no heavy browning or brittleness.
- For storage: Keep roll in a dry place, away from moisture to prevent curling or warping.
Final thoughts
Choosing the right parchment paper and using it effectively will elevate your baking paper and cooking. Whether you’re doing cookies, cakes, roasts or meal-prep, this simple tool saves time, improves results and delivers cleaner trays. For reliable supplies, brands such as delipaper.co.uk are worth considering.
By paying attention to quality, fit and correct usage you give your kitchen a small but powerful upgrade — better bakes, easier cleanup, happier cooking.
That’s your detailed guide to parchment paper — use it w
Frequently Asked Questions
Can I reuse parchment paper?
Yes, if the sheet is still clean, not heavily browned or torn. Reuse is generally fine for lighter tasks.
Is parchment paper the same as baking paper?
Yes. In many regions, “baking paper” and “parchment paper” refer to the same non-stick, heat-resistant sheet.
Can I use parchment paper in an air fryer?
Yes — provided it’s trimmed to fit properly and doesn’t cover the heating element or block air flow. It helps reduce mess and prevents sticking.
What temperature limit should I look for?
Many standard parchment papers handle up to around 220-230°C (~428-445°F). For higher temps, check supplier specs.: Is parchment paper eco-friendly?
Unbleached parchment is often compostable and more sustainable than alternatives. Select food-grade, silicone-coated, and eco-certified rolls when possible.