
Introduction
A well-designed light plot is the backbone of any successful stage production. It ensures that performers are clearly visible, sets the mood for each scene, and enhances the overall storytelling experience. With the advancement of modern lighting technology, designers now have access to powerful tools and beam effects that can transform any stage into a dynamic visual environment.
However, creating an effective light plot requires more than just placing lights randomly. It involves careful planning, understanding the performance, and using lighting techniques strategically. In this guide, we’ll explore how to design a more effective light plot using modern tools and methods, while keeping the process simple and practical.
Understanding Theater Stage Lights
To design a strong light plot, you must first understand how theater stage lights function and what they can achieve. These lights are specifically designed to illuminate performers, highlight key moments, and create depth on stage.
Common types include:
- Spotlights for focused illumination
- Wash lights for broad coverage
- Fresnel lights for soft edges
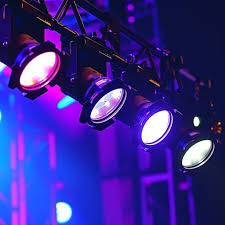
- Moving head lights for dynamic motion
- Beam lights for sharp, visible light effects
Each type plays a unique role in your light plot. By combining them effectively, you can create balanced lighting that enhances both visibility and artistic expression. Modern theater lighting also allows for precise control over brightness, color, and movement, making it easier to design complex yet effective setups.
What Is a Light Plot and Why It Matters
A light plot is a visual plan that shows where lighting fixtures will be placed and how they will be used during a performance. It acts as a blueprint for your lighting design, helping technicians set up equipment correctly and ensuring consistency during the show.
An effective light plot helps you:
- Avoid uneven lighting and dark spots
- Ensure all performers are visible from every angle
- Coordinate lighting with stage movement and cues
- Save time during setup and rehearsals
Without a proper light plot, even the best lighting equipment can fail to deliver the desired results. Planning ahead ensures that every light serves a purpose and contributes to the overall design.
Key Elements of an Effective Light Plot
Designing a successful light plot involves several important elements:
Stage Coverage
Make sure the entire stage is covered with appropriate lighting. Divide the stage into zones and assign lights to each area to avoid shadows or uneven brightness.
Lighting Angles
Use a combination of front, side, and backlighting. Front lights illuminate faces, side lights add depth, and backlights separate performers from the background.
Beam Effects
Modern beam lights create sharp, visible lines that add drama and excitement. These effects are especially useful for concerts and dynamic scenes, where movement and energy are important.
Color Design
Choose colors that match the mood of the performance. Warm tones can create a welcoming atmosphere, while cool tones can add tension or drama.
Intensity Control
Adjust brightness levels to ensure that lighting is balanced. Avoid overly bright or dim areas that can distract the audience.
Steps to Design an Effective Light Plot
Creating a light plot may seem complex, but breaking it into simple steps makes the process manageable:
Step 1: Understand the Performance
Read the script or event plan carefully. Identify key moments, transitions, and areas where lighting will play an important role.
Step 2: Map the Stage
Sketch the stage layout, including set pieces and performer positions. Divide the stage into zones to ensure complete coverage.
Step 3: Choose the Right Fixtures
Select lighting fixtures based on your needs. Combine spotlights, wash lights, and beam lights for a balanced setup.
Step 4: Plan Lighting Positions
Decide where each light will be placed. Consider angles, height, and distance to achieve the desired effect.
Step 5: Add Beam Effects Strategically
Use beam effects to highlight important moments or create visual impact. Avoid overusing them, as too many effects can become distracting.
Step 6: Test and Adjust
Run rehearsals with full lighting. Observe how the lights interact with performers and make adjustments as needed.
Integrating Event Lighting Equipment into Your Design
Modern productions often rely on advanced event lighting equipment to enhance light plots and create more dynamic effects. These tools provide greater flexibility, allowing you to control movement, color, and intensity with precision.
For example, moving head lights can follow performers across the stage, while LED fixtures offer a wide range of color options. Beam lights can create dramatic effects that add excitement to the performance. By integrating these tools into your light plot, you can achieve a professional and polished look.
The key is to use technology thoughtfully. Instead of adding effects just for the sake of it, focus on how each element contributes to the story and overall visual experience.
Helpful Tips for Better Light Plot Design
Designing an effective light plot becomes easier with practice, but these tips can help you improve quickly:
- Keep your design simple and purposeful
- Focus on visibility first, then add creative effects
- Use layering techniques to create depth
- Test lighting from the audience’s perspective
- Adjust lighting for different scenes and moods
These tips ensure your light plot remains functional while still allowing room for creativity.
Common Mistakes to Avoid
Even experienced designers can make mistakes when creating a light plot. Some common ones include:
- Overcomplicating the design with too many lights or effects
- Ignoring performer movement and blocking
- Using inconsistent color schemes
- Failing to test lighting during rehearsals
- Not considering audience viewing angles
Avoiding these mistakes helps you create a more effective and professional lighting design.
FAQs
Q1: What is the purpose of a light plot?
A light plot serves as a blueprint for lighting design, ensuring proper placement and use of fixtures during a performance.
Q2: How many lights should I include in my plot?
The number depends on stage size and production needs. Focus on coverage and balance rather than quantity.
Q3: Can beam effects be used in small productions?
Yes, but they should be used sparingly to avoid overwhelming the performance.
Q4: How do I improve lighting for moving performers?
Use adjustable or moving lights to track performers and maintain consistent visibility.
Q5: Do I need professional software to create a light plot?
While helpful, simple sketches or diagrams can also work for smaller productions.
Final Words
Designing an effective light plot is both a technical and creative process. By understanding how theater stage lights work and integrating modern techniques like beam effects, you can create a lighting design that enhances every aspect of a performance. Careful planning, testing, and adjustment ensure that your setup delivers consistent and professional results.Using advanced event lighting equipment allows you to bring your creative vision to life while maintaining precision and control. For those looking to upgrade their lighting setups, Sound Dance ships products to the USA, providing access to high-quality equipment that supports both small and large productions.

